Picture yourself on a crisp autumn afternoon, surrounded by the smell of freshly pressed apples and the quiet anticipation of fermentation magic about to unfold in your kitchen. Making hard apple cider at home is one of those rewarding projects that feels like alchemy, yet surprisingly approachable for anyone willing to pay attention to a few key details.
This recipe yields a smooth, naturally carbonated cider with a perfect balance of sweetness and tartness, and you control every flavor note from start to finish. The beauty of homemade cider is that it’s hands-off once fermentation begins, making it ideal for patient home cooks who want to skip store shelves and craft something genuinely their own.
Why You’ll Love This Recipe
Homemade hard cider tastes fresher and more complex than commercial versions, and you’ll save money over time once your equipment pays for itself.
- Full control over sweetness, carbonation level, and flavor profile
- Requires minimal active work; most time is hands-off fermentation
- Impressive to serve at gatherings and genuinely tasty
- A rewarding hobby that teaches you about yeast, patience, and chemistry
- Perfect use for fresh or bulk apple juice
My Experience Making This Recipe
The first time I made hard cider, I was nervous about contamination and fermentation stalling, but watching those first bubbles rise through the airlock was pure magic. My kitchen smelled like an orchard for weeks, and guests kept asking what I was making because the aroma was so inviting.
The finished cider had a golden clarity that store-bought versions rarely achieve, with a gentle fizz and subtle apple complexity that made me feel like a genuine cider maker. I’ve now made several batches, and each one teaches me something new about how temperature, juice quality, and yeast strain affect the final product.
The waiting is the hardest part, honestly, but it’s absolutely worth the patience when you pop that first bottle and taste something you created from scratch.
Recipe Overview
- Recipe Name: Hard Apple Cider
- Servings: About 5 gallons (20 servings of 12 ounces each)
- Prep Time: 30 minutes
- Fermentation Time: 4 to 6 weeks
- Total Time: 4 to 6 weeks plus conditioning
- Course: Beverage
- Cuisine: American/Cider Making
- Calories per Serving: Approximately 120 calories per 12 ounces
Equipment You Will Need
- 5-gallon glass carboy or food-grade plastic fermentation vessel
- Rubber tubing and airlock (S-shaped or 3-piece airlock)
- Hydrometer (to measure fermentation progress)
- Large food-grade bucket or sanitized pot for mixing
- Siphon and racking cane for transferring cider
- Sanitizer (Star San or equivalent)
- Thermometer
- Bottle capper and crown caps or swing-top bottles for carbonation
- Auto-siphon (optional but highly recommended)
- Wine thief or small sampling tube
Ingredients for Hard Apple Cider
- 5 gallons of apple juice (fresh pressed, unfiltered, or quality store-bought without preservatives like potassium sorbate)
- 1 packet of cider yeast (such as Wyeast 1098 or SafaleS-04, or liquid cider yeast)
- 1 teaspoon of yeast nutrient (helps yeast stay healthy and ferment cleanly)
- Optional: 1 pound of honey (adds complexity and boosts alcohol content slightly)
- Optional: Cinnamon stick or fresh ginger (added during secondary fermentation for flavor)
Ingredient Notes and Substitutions
- Apple Juice: Choose juice without preservatives like potassium sorbate, which inhibits yeast. Substitution: Fresh pressed juice is ideal, but any unpasteurized or gently pasteurized juice works; avoid ultra-pasteurized.
- Cider Yeast: Cider-specific yeasts like Wyeast 1098 produce fewer off-flavors and work faster than bread yeast. Substitution: Wine yeast like SafaleS-04 works, though it takes slightly longer; never use bread yeast, as it produces unwanted flavors.
- Yeast Nutrient: Apples lack nitrogen compounds that yeast needs, so nutrient prevents stuck fermentations and sulfur smells. Substitution: You can omit it for a cleaner finish, but your fermentation may take longer and taste a bit harsher.
- Honey: Adds body, subtle sweetness, and complexity without dominating the apple flavor. Substitution: Brown sugar or maple syrup adds similar richness but changes the flavor profile slightly.
How to Make Hard Apple Cider
Step 1: Sanitize All Equipment
Mix sanitizer according to package directions (typically 1 teaspoon per gallon of water for Star San) and soak your carboy, airlock, tubing, and any other equipment that will touch the cider for at least 5 minutes. Clean equipment prevents wild yeasts and bacteria from outcompeting your cultured yeast and ruining your batch.
Step 2: Prepare Your Apple Juice
Pour your 5 gallons of apple juice into a large, clean bucket or directly into your carboy if you’re confident it’s been thoroughly sanitized. If using store-bought juice that may have been refrigerated, allow it to come to room temperature (around 65 to 70 degrees Fahrenheit), as cold juice slows yeast activation.
Step 3: Add Yeast Nutrient
Stir 1 teaspoon of yeast nutrient directly into the apple juice and mix well for about 30 seconds. This ensures the nutrient distributes evenly and provides nitrogen throughout the fermentation.
Step 4: Rehydrate Your Yeast
Pour a small amount of warm (not hot) apple juice into a sanitized glass and sprinkle your yeast packet over it, letting it sit for 5 to 10 minutes. Rehydrating yeast in juice instead of plain water helps it acclimate to the sugar environment and produces stronger fermentation.
Step 5: Pitch the Yeast
Stir the rehydrated yeast gently and pour the entire mixture into your carboy of apple juice. Swirl the carboy gently a few times to distribute the yeast evenly, but avoid vigorous shaking, which introduces excessive oxygen.
Step 6: Attach the Airlock and Monitor
Fill your airlock with sanitizer or a weak water solution (half water, half sanitizer works fine) and attach it to the carboy’s stopper. Within 24 to 48 hours, you should see steady bubbling through the airlock, indicating that fermentation has begun successfully.
Step 7: Primary Fermentation
Keep your carboy at a stable temperature between 65 and 75 degrees Fahrenheit, away from direct sunlight, for 2 to 3 weeks. During this phase, yeast consumes sugars rapidly and produces carbon dioxide; you’ll notice vigorous bubbling and a slight apple-wine smell developing.
After 2 to 3 weeks, the bubbling will slow noticeably, indicating that primary fermentation is nearly complete. You can check progress by using a hydrometer to measure specific gravity; when readings remain stable for 3 to 5 days, fermentation is done.
Step 8: Rack to Secondary Fermentation
Using a sanitized siphon or auto-siphon, carefully transfer your cider from the primary carboy to a clean secondary carboy, leaving behind the sediment and yeast solids at the bottom. This separation prevents off-flavors from dead yeast and allows the cider to clarify.
Attach a fresh airlock filled with sanitizer, and let the cider sit for another 2 to 4 weeks at stable temperature. The secondary fermentation is much quieter, with only occasional bubbling, as remaining yeast cleans up byproducts and the cider naturally settles.
Step 9: Final Transfer and Bottling
Once fermentation has truly stopped (no airlock activity for several days and stable hydrometer readings), rack the cider one final time into bottles. If you want carbonation, use flip-top or crown-cap bottles and add a small amount of priming sugar (about 1/4 to 1/2 teaspoon per 12-ounce bottle) to feed the remaining yeast and create natural fizz.
For flat cider, simply fill bottles and cap them without priming sugar. Store bottles upright in a cool, dark place for 1 to 2 weeks if priming, or immediately refrigerate if you prefer it flat.
Pro Tip: Temperature control is your secret weapon; consistent 65 to 70 degree Fahrenheit fermentation produces cleaner flavor and faster completion than warmer or fluctuating temperatures, so invest in a small thermostat-controlled heating belt if your home runs cool.
Tips for the Best Hard Apple Cider
- Use the freshest, highest-quality apple juice you can find; fresh-pressed local juice produces dramatically more complex flavor than commodity store brands.
- Maintain steady temperature by placing your carboy in a closet, basement, or cooler with a heating belt; temperature swings stress yeast and create unpleasant flavors.
- Resist the urge to open or move your carboy frequently; every disturbance risks infection and disrupts yeast settling.
- Keep detailed notes on dates, temperatures, specific gravity readings, and any adjustments you make so you can replicate successes and learn from mistakes.
- If you want to add spices, do it during secondary fermentation rather than primary, as it adds flavor without overwhelming the apple profile.
- Taste your cider partway through secondary fermentation using a sanitized wine thief; this teaches you how flavors evolve and helps you decide when it’s ready.
Common Mistakes to Avoid
- Using juice with potassium sorbate: This preservative kills yeast before fermentation begins, guaranteeing failure, so always check labels carefully.
- Fermenting in direct sunlight: Ultraviolet light breaks down yeast and creates skunky flavors, so keep your carboy in a dark space throughout fermentation.
- Bottling too early: If you bottle before fermentation truly stops, you risk exploding bottles from pressure buildup; wait for stable hydrometer readings to be sure.
- Using contaminated equipment: Even tiny amounts of wild yeast or bacteria can outcompete your cultured yeast and produce vinegar or off-flavors, so sanitize thoroughly.
- Forgetting yeast nutrient: Apples are nitrogen-poor, and skipping nutrient often results in sluggish fermentation that takes months or stalls completely.
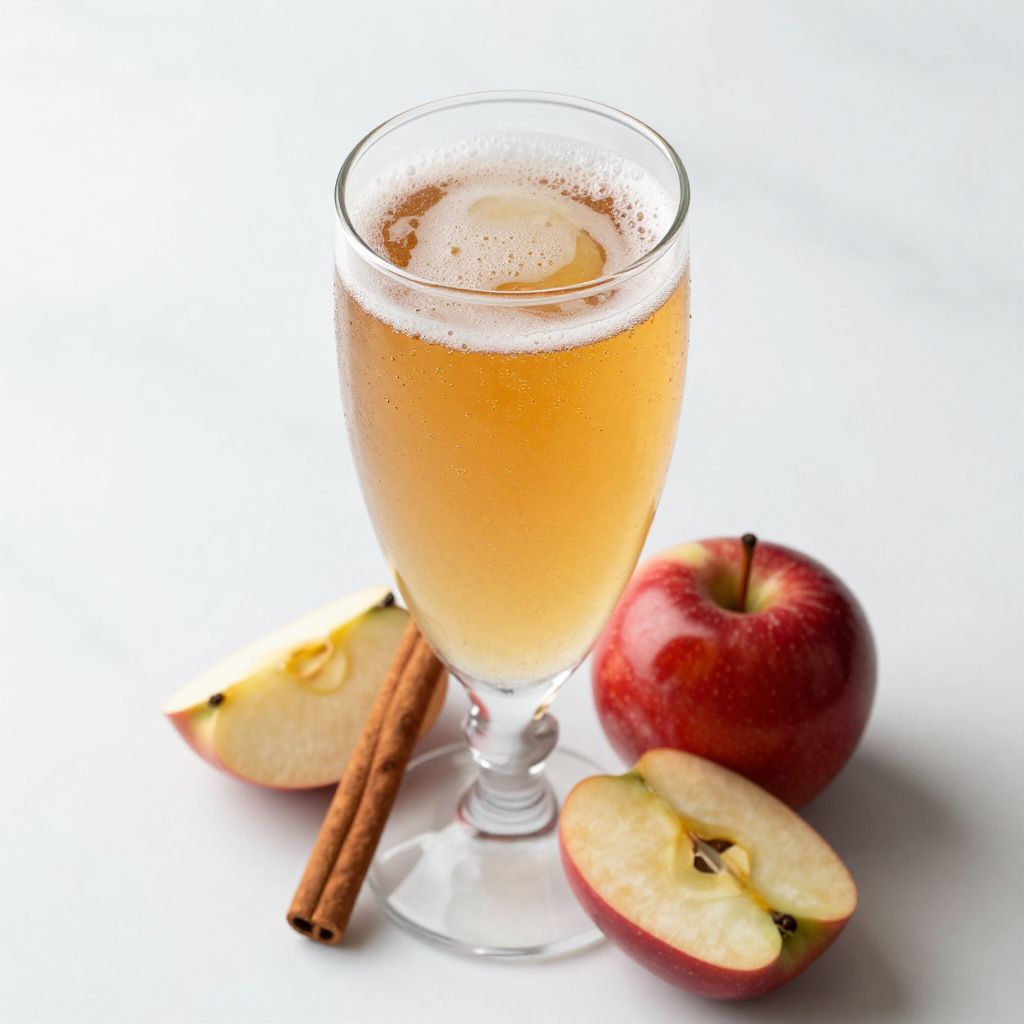
Serving Suggestions
Serve your homemade cider well-chilled in a glass with a slight head of foam if it’s carbonated, ideally around 45 to 50 degrees Fahrenheit for optimal flavor and refreshment. The subtle apple complexity and natural sweetness make it wonderfully versatile at the table or enjoyed casually.
- Pair with sharp cheddar, aged gouda, or blue cheese for a cheese board that sings
- Serve alongside roasted pork tenderloin or apple-brined chicken for natural flavor harmony
- Mix with sparkling water to create a lighter spritz for brunch
- Enjoy by itself as a sophisticated non-beer alternative for cider lovers
- Pour over vanilla ice cream for an adults-only apple float
Variations to Try
- Spiced Cider: Add 1 cinnamon stick, 3 to 4 whole cloves, and a small piece of fresh ginger to secondary fermentation for a warming, fall-inspired version.
- Dry Cider: Use juice with lower natural sugar content (check the label) or reduce sweetness by fermenting longer, creating a crisp, wine-like finish perfect for those who prefer minimal residual sweetness.
- Honey Cider: Include 1 pound of raw honey during primary fermentation to add body, floral notes, and a slight boost in final alcohol content.
- Hopped Cider: Add 0.5 to 1 ounce of a noble hop variety like Hallertau during the last week of secondary fermentation for subtle herbal complexity.
- Fruit Infusion: After primary fermentation, add fresh raspberries, blackberries, or stone fruit puree to secondary for a fruit-forward twist that remains refreshing.
Dietary Adaptations
- Gluten-Free: Hard cider is naturally gluten-free since it ferments from apples and yeast; verify your yeast nutrient is gluten-free, as some brands contain cereal additives.
- Vegan: This recipe is entirely vegan; ensure your yeast and nutrient are vegan-certified, though most cider yeasts and nutrients are plant-based by default.
- Lower Alcohol: Ferment at cooler temperatures (around 65 degrees) with less yeast nutrient, or use juice with lower brix (sugar content) to produce a lighter, more refreshing version around 4 to 5 percent alcohol.
- Low-Carb: Once fermentation fully completes, residual sugar drops dramatically; a fully dry cider contains only 1 to 2 grams of carbohydrates per serving.
Storage and Reheating
Refrigerator
Store finished bottles in a refrigerator at 35 to 45 degrees Fahrenheit, where they keep for 6 to 12 months or longer. Cold temperatures slow any remaining yeast and preserve flavor clarity beautifully.
- Keep bottles upright to minimize exposure to air
- Check crown caps or flip-tops occasionally to ensure seals remain tight
- Consume within the first 3 months for peak freshness and carbonation
Freezer
Hard cider can freeze, though carbonated bottles may rupture, so store only uncarbonated cider in the freezer. Frozen cider keeps for up to 2 years but may separate slightly when thawed, so gently swirl before serving.
- Use plastic bottles or leave 1 to 2 inches of headspace in glass bottles to prevent cracking
- Thaw in the refrigerator overnight before opening
Reheating
Hard cider is not typically reheated, but you can gently warm it on the stovetop in a saucepan over low heat if you want hot spiced cider for cold months. Never boil cider, as heat destroys flavor and carbonation.
- Warm to 140 to 160 degrees Fahrenheit for a comforting warm beverage
- Add warming spices like cinnamon or cloves during warming for extra flavor
Nutrition Information
| Nutrient | Amount |
|---|---|
| Calories | 120 |
| Total Fat | 0 g |
| Saturated Fat | 0 g |
| Carbohydrates | 2 g |
| Fiber | 0 g |
| Sugar | 1 g |
| Protein | 0 g |
| Sodium | 5 mg |
| Cholesterol | 0 mg |
Nutritional values are approximate and based on a fully fermented cider with minimal residual sugar; actual values vary depending on juice type, fermentation completion, and any additions like honey or spices.
Frequently Asked Questions
Can I use any apple juice, or does it have to be fresh-pressed?
Fresh-pressed juice creates the most complex and flavorful cider, but quality store-bought juice works perfectly fine if it contains no preservatives like potassium sorbate. Check the label carefully, avoid ultra-pasteurized varieties, and your batch will ferment beautifully.
How do I know when fermentation is truly complete?
Take hydrometer readings three days in a row; if the specific gravity remains unchanged, fermentation is done. You can also watch the airlock; when bubbling stops entirely for several days, primary fermentation is finished.
Can I make cider in winter when my house is cold?
Yes, but invest in a heating belt that maintains 65 to 70 degrees Fahrenheit around your carboy; fermentation slows dramatically below 60 degrees and may produce off-flavors. A simple thermostat-controlled heating belt solves this problem completely.
Why does my cider taste vinegary or sour?
Vinegar flavors typically come from acetobacter contamination (wild bacteria) or from fermenting at temperatures that are too warm or inconsistent. Future batches fermented at steady, cool temperatures with thoroughly sanitized equipment will avoid this issue.
Is homemade cider safe to drink?
Yes, fermented cider is completely safe because the alcohol produced and the low pH prevent harmful bacteria from surviving. The fermentation process itself eliminates pathogens that might be present in raw juice, making cider actually safer than fresh apple juice.
How much alcohol will my cider have?
Most hard ciders end up between 5 and 7 percent alcohol by volume, depending on juice sugar content (brix) and how completely the yeast ferments. You can estimate this roughly by checking initial and final specific gravity readings with a hydrometer.
Final Thoughts
Making hard
Hard Apple Cider
Ingredients
Equipment
Method
- Mix sanitizer according to package directions (typically 1 teaspoon per gallon of water for Star San) and soak your carboy, airlock, tubing, and any other equipment that will touch the cider for at least 5 minutes.
- Pour your 5 gallons of apple juice into a large, clean bucket or directly into your carboy. If using refrigerated juice, allow it to come to room temperature (around 65 to 70 degrees Fahrenheit).
- Stir 1 teaspoon of yeast nutrient directly into the apple juice and mix well for about 30 seconds to distribute evenly.
- Pour a small amount of warm (not hot) apple juice into a sanitized glass and sprinkle your yeast packet over it, letting it sit for 5 to 10 minutes to rehydrate.
- Stir the rehydrated yeast gently and pour the entire mixture into your carboy of apple juice. Swirl the carboy gently a few times to distribute the yeast evenly.
- Fill your airlock with sanitizer or a weak water solution (half water, half sanitizer) and attach it to the carboy's stopper. Within 24 to 48 hours, you should see steady bubbling indicating fermentation has begun.
- Keep your carboy at a stable temperature between 65 and 75 degrees Fahrenheit, away from direct sunlight, for 2 to 3 weeks during primary fermentation. You'll notice vigorous bubbling during this phase.
- After 2 to 3 weeks when bubbling slows noticeably, use a sanitized siphon to transfer your cider from the primary carboy to a clean secondary carboy, leaving behind the sediment at the bottom.
- Attach a fresh airlock filled with sanitizer, and let the cider sit for another 2 to 4 weeks at stable temperature for secondary fermentation and clarification.
- Once fermentation has truly stopped (no airlock activity for several days and stable hydrometer readings), rack the cider one final time into bottles. For carbonation, add 1/4 to 1/2 teaspoon of priming sugar per 12-ounce bottle. For flat cider, simply fill bottles without priming sugar.
- Store bottles upright in a cool, dark place for 1 to 2 weeks if carbonating, or immediately refrigerate if you prefer it flat.