
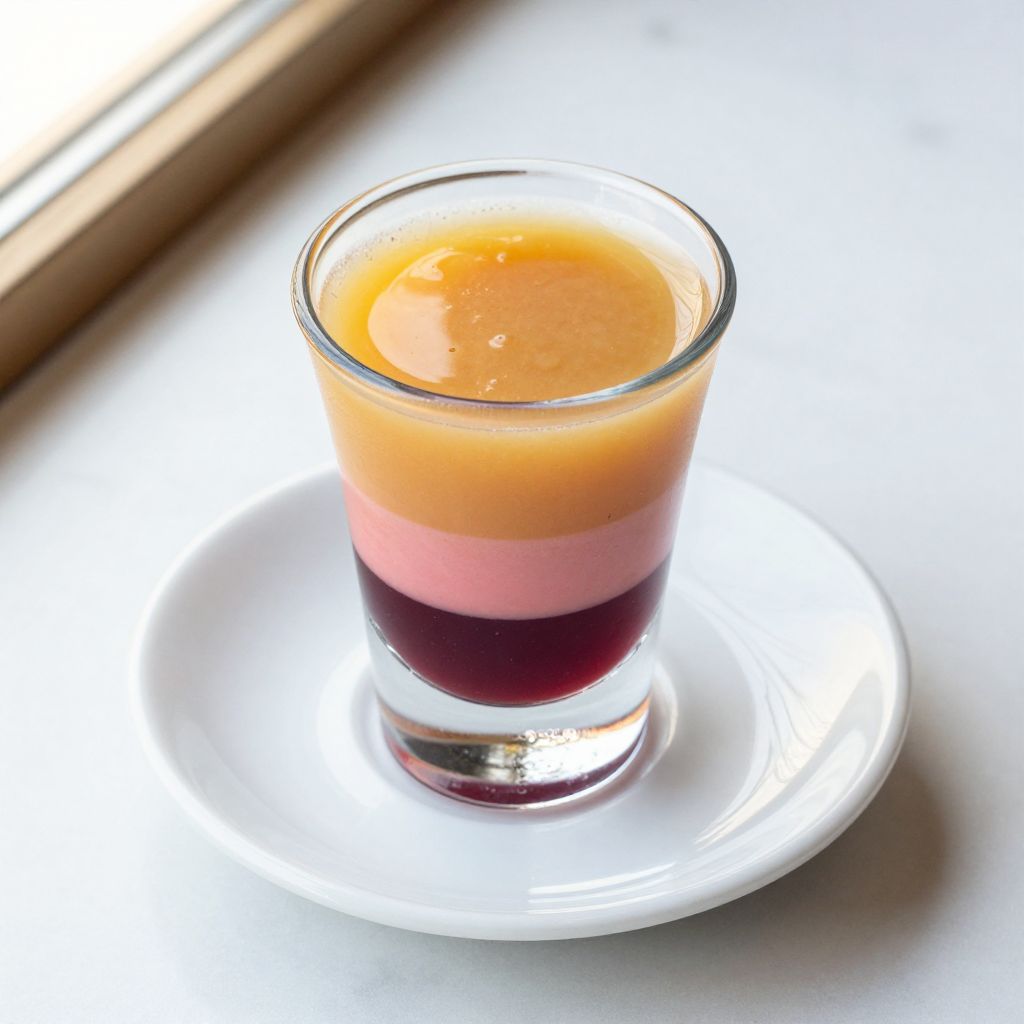
Picture yourself on a sun-soaked beach, tropical breeze in your hair, and a vibrant layered drink in your hand that tastes like pure Caribbean paradise. The Bob Marley drink is exactly that kind of moment in a glass, with its striking three-color layers that practically glow under the light. This iconic shot combines rum, liqueurs, and tropical flavors in a way that makes it unforgettable both visually and taste-wise.
What makes this recipe special is how the layers stay perfectly separated when you pour with care, creating that show-stopping presentation that screams “party.” The flavors work together beautifully: a smooth blend of rum warmth, fruity sweetness, and a hint of citrus brightness that goes down remarkably easy. Whether you’re mixing these for a gathering or impressing someone at home, this drink delivers on both looks and flavor.
Why You’ll Love This Recipe
The Bob Marley drink checks every box for a crowd-pleasing party shot.
- Visually stunning with three distinct color layers that catch every eye in the room.
- Quick to make once you have the ingredients measured and ready.
- Tastes tropical and smooth, going down way too easily.
- Works for any celebration, from beach parties to casual gatherings.
- Simple enough for home bartenders but impressive enough to feel professional.
My Experience Making This Recipe
The first time I made a Bob Marley drink, I was skeptical about whether the layers would actually stay separated as promised. Turns out, patience and the right pouring technique make all the difference, and watching those three colors settle into place feels genuinely magical.
I served these at a backyard summer gathering, and they became the instant conversation starter of the night. People kept asking how I got the colors so perfect, and I loved explaining the pour technique and watching their faces light up when they took the first sip.
The taste caught everyone off guard in the best way: it’s sweet and fruity without being cloying, with just enough rum bite to remind you it’s actually an alcoholic drink. Since then, these have become my go-to shot for any occasion where I want to impress without breaking a sweat.
Recipe Overview
- Recipe Name: Bob Marley Drink (Layered Shot)
- Servings: 1 shot
- Prep Time: 3 minutes
- Cook Time: 0 minutes
- Total Time: 3 minutes
- Course: Cocktail / Shot
- Cuisine: Caribbean
- Calories per Serving: 150 calories
Equipment You Will Need
- 1.5-ounce shot glass
- Jigger (for accurate measuring)
- Bar spoon or long thin spoon
- Small mixing bottle or container (optional, for pre-mixing)
- Pouring spout (helpful but not essential)
Ingredients for Bob Marley Drink
- 0.5 ounces Creme de Almond liqueur (creates the red/pink bottom layer)
- 0.5 ounces Coconut Rum (creates the middle yellow/golden layer)
- 0.5 ounces Grenadine syrup (creates the deep red base, poured first)
- Ice cubes (for chilling the glass, optional but recommended)
Ingredient Notes and Substitutions
- Grenadine Syrup: This is the heaviest ingredient by weight, which is why it settles at the bottom and creates that deep ruby base. If you can’t find grenadine, you can make a simple substitute by mixing equal parts pomegranate juice and sugar, but the flavor will be slightly different.
- Creme de Almond Liqueur: This adds almond sweetness and helps create the layered effect with its specific gravity. Amaretto can work as a substitute, though it will make the drink slightly less sweet and more nutty.
- Coconut Rum: Malibu or similar coconut-flavored rum brands work best here for that tropical taste and the right color. Regular white rum will change the visual effect significantly and add less tropical flavor.
How to Make Bob Marley Drink
Step 1: Chill Your Shot Glass
Fill your shot glass with ice cubes and let it sit for 30 seconds to a minute. A cold glass keeps the drink chilled and helps the layers set more distinctly.
Step 2: Measure Your Grenadine
Pour 0.5 ounces of grenadine syrup into your jigger. This will be your first ingredient and creates the deep red bottom layer of the shot.
Step 3: Pour the Grenadine Base
Slowly pour the grenadine into the center of your chilled shot glass. This syrup is the heaviest ingredient, so it naturally sinks to the bottom and creates that beautiful ruby foundation.
Step 4: Measure Your Creme de Almond
Pour 0.5 ounces of creme de almond liqueur into your jigger. Make sure your measurements are precise so the layers stay balanced.
Step 5: Layer the Almond Liqueur
Hold a bar spoon (or regular thin spoon) just above the grenadine layer, and slowly pour the creme de almond over the spoon’s back so it flows gently over the existing layer. This technique prevents the liqueurs from mixing too quickly and helps the colors stay distinct.
Step 6: Measure Your Coconut Rum
Pour 0.5 ounces of coconut rum into your jigger. This will be your top layer and contributes that tropical flavor.
Step 7: Layer the Coconut Rum
Using the same spoon technique, pour the coconut rum over the back of your spoon so it settles gently on top of the almond layer. Work slowly and carefully here, because if you pour too fast, you’ll lose your layers.
Step 8: Let It Settle
Wait about 10 to 15 seconds after pouring the final ingredient before serving or drinking. This gives the layers time to fully separate and creates that striking three-color effect that makes this drink so visually impressive.
Pro Tip: The key to perfect layers is pouring slowly over the back of a spoon and waiting for each layer to fully settle before adding the next one. Rushing this step is the quickest way to end up with a muddy brown drink instead of three distinct colors.
Tips for the Best Bob Marley Drink
- Use a chilled shot glass so the liqueurs stay at their proper densities and layer correctly. Warm glass can cause the layers to blend together.
- Pour each ingredient slowly and deliberately, especially the top layers. Speed is your enemy when layering drinks.
- If you don’t have a bar spoon, the back of a regular teaspoon or even a butter knife works fine for controlling the pour. The goal is just to break the fall of the liquid.
- Room temperature ingredients actually work better for layering than ice-cold ones. Cold liqueurs get thicker and don’t flow as smoothly into layers.
- Serve immediately after layering while the colors are still distinct and bright. The longer it sits, the more the layers blend together.
- Hold the glass up to the light to admire your work before drinking. This drink deserves a moment to shine.
Common Mistakes to Avoid
- Pouring too fast: This is the number one reason layers blend instead of staying separate. Slow and steady wins the race with this drink.
- Using a warm glass: Heat works against you here, making it harder for the different liqueur densities to stay distinct. Always chill your glass first.
- Skipping the spoon technique: Pouring directly onto the existing layer almost always causes mixing. Use the spoon every single time.
- Measuring inaccurately: If your proportions are off, the specific gravities won’t work properly and layering becomes nearly impossible.
- Using the wrong liqueur brands: Substituting with different brands changes the sugar content and density, which throws off the entire layering effect.
Serving Suggestions
The Bob Marley drink is a party shot that stands on its own, but you can make the experience even better with the right setting and accompaniments.
- Serve as a shot at the end of a meal or during a celebration. The sweet flavor makes it feel a bit like dessert.
- Pair with tropical-themed snacks like coconut cookies, mango slices, or macadamia nuts. These complement the tropical flavors beautifully.
- Offer a chaser of cold water or club soda if you’re serving to guests unfamiliar with sweet shots. The sweetness can be intense for some people.
- Display several of these in a row on a bar top to create a stunning visual effect. The colors catch light and make for great photos.
- Serve alongside other Caribbean cocktails to build out a themed party spread.
Variations to Try
- Spiced Marley: Replace the coconut rum with spiced rum for a warmer, more complex top layer that adds depth to the drink. The spice plays nicely against the sweet almond and grenadine base.
- Tropical Twist: Use pineapple rum instead of coconut rum to shift the fruit profile toward tropical brightness. This version tastes lighter and more refreshing overall.
- Berry Marley: Swap grenadine for chambord or another berry liqueur to change the base flavor to berry instead of pomegranate. This keeps the visual appeal but shifts the taste profile.
- Layered Paradise: Add a fourth layer by including 0.25 ounces of blue curacao between the almond and coconut rum. This creates four colors and adds a subtle citrus note.
- Creamy Version: Replace 0.25 ounces of the coconut rum with Irish cream liqueur for a smoother, creamier top layer. This makes the drink feel more dessert-like.
Dietary Adaptations
- Gluten-Free: Most liqueurs used here are naturally gluten-free, but check your specific brand labels as some may contain gluten in additives. The base ingredients are all gluten-free.
- Dairy-Free: Stick to the standard recipe as listed, since none of the core ingredients contain dairy. Only avoid the Creamy Version variation if dairy is a concern.
- Vegan: All the liqueurs and syrups in the standard recipe are vegan, so this drink works perfectly for vegans who enjoy alcohol. No animal products are involved.
- Low-Carb/Keto: This drink is not suitable for strict keto due to the high sugar content in grenadine and liqueurs. Consider this a special occasion treat rather than a regular option on a low-carb diet.
Storage and Reheating
Refrigerator
You can store unopened bottles of grenadine and liqueurs in your pantry or bar cabinet for years. Once opened, keep liqueurs in a cool, dark place and grenadine in the refrigerator.
- Grenadine keeps for 1 month after opening in the refrigerator.
- Liqueurs keep indefinitely after opening if stored properly.
- Never refrigerate the mixed drink itself, as it’s meant to be consumed immediately after making.
Freezer
You can chill pre-measured amounts of each ingredient in separate small containers if you’re planning to make multiple shots at once.
- Pour each ingredient into separate ice cube trays or small containers and freeze for up to 2 months.
- Thaw slightly and use within 24 hours of removing from the freezer for best results.
Reheating
This drink is served cold and is not reheated, as it’s a shot meant to be consumed immediately after preparation. Store ingredients properly to ensure they’re always ready to use.
Nutrition Information
| Nutrient | Amount |
|---|---|
| Calories | 150 |
| Total Fat | 0g |
| Saturated Fat | 0g |
| Carbohydrates | 18g |
| Fiber | 0g |
| Sugar | 16g |
| Protein | 0g |
| Sodium | 5mg |
| Cholesterol | 0mg |
These nutritional values are estimates based on standard ingredient measurements and brands. Actual nutrition may vary slightly depending on the specific products you use and any modifications you make to the recipe.
Frequently Asked Questions
Can I make this drink ahead of time?
No, this drink must be made fresh right before serving to maintain the beautiful layered effect. The layers will gradually blend together over time, so timing is essential for the visual appeal.
What if my layers keep mixing together?
This usually happens when you pour too fast or use warm ingredients and glass. Chill your glass thoroughly, use room temperature liqueurs, and pour very slowly over a spoon.
Can I use different liqueurs to make this drink?
You can experiment, but the specific gravity of each ingredient is what creates the layers. Substituting different liqueurs changes these densities and often ruins the layering effect, so stick with the recipe for best results.
How strong is this drink?
This is a potent shot with about 1.5 ounces of alcohol in a single serving. It goes down smooth and sweet, so people often underestimate the strength, so drink responsibly.
Why is my drink brown instead of three colors?
This happens when the layers mix together, usually from pouring too fast or using warm ingredients. The good news is you can still drink it, it just won’t look as impressive, so your next attempt will be better.
Can I make a larger batch of these for a party?
Each shot must be layered individually to maintain the effect, so batch-making isn’t really practical. The good news is they only take a few minutes to make, so you can prepare several in quick succession right before serving.
Final Thoughts
The Bob Marley drink is one of those rare shots that manages to be both visually stunning and genuinely delicious. Once you nail the layering technique, you’ll find yourself making these again and again because they’re surprisingly simple and always impress.
This recipe gives you everything you need to become the person who makes the show-stopping shots at any gathering. Mix these with confidence, serve them with pride, and enjoy the compliments that follow.
If you love tropical flavors and eye-catching cocktails, explore more Caribbean drink options that showcase similar vibrant tastes and colors. Check out this Jamaican Peanut Punch Recipe for another authentic Caribbean classic, or try this Barbados Rum Punch Recipe to expand your tropical cocktail repertoire even further.
Bob Marley Drink (Layered Shot)
Ingredients
Equipment
Method
- Fill the shot glass with ice cubes and let it chill for 30 seconds to 1 minute.
- Measure 0.5 ounces of grenadine syrup and slowly pour it into the center of the chilled shot glass.
- Measure 0.5 ounces of creme de almond liqueur and layer it over the grenadine by gently pouring it over the back of a spoon.
- Measure 0.5 ounces of coconut rum and layer it over the creme de almond by gently pouring it over the back of a spoon.
- Let the layers settle for 10 to 15 seconds before serving to ensure three distinct colors.