
The first time I blended taro root into a smoothie, I was skeptical—a purple starch didn’t sound like it belonged in a drink. Now I’m hooked on the creamy texture and subtle nutty sweetness that transforms a simple smoothie into something genuinely special.
Taro smoothies are having a moment, and for good reason. They’re naturally creamy without dairy, packed with fiber and resistant starch, and visually stunning with that gorgeous purple hue that makes every sip feel Instagram-worthy.
This recipe delivers a silky, naturally sweet drink in under five minutes, with room to adapt it however you like. Whether you’re after a quick breakfast or a post-workout refuel, taro works beautifully here.
Why You’ll Love This Recipe
Taro smoothies are the rare drink that tastes indulgent while actually being good for you. The root vegetable brings creaminess without cream, making it perfect for anyone avoiding dairy or simply wanting something different.
- Ready in under 5 minutes from start to finish
- Naturally creamy texture without yogurt or milk thickeners
- Stunning purple color that impresses without artificial dyes
- High in fiber and resistant starch for steady energy
- Endlessly customizable to your taste and dietary needs
My Experience Making This Recipe
The first batch I made turned out thinner than expected because I used frozen taro that released too much water. I learned quickly that the ratio of taro to liquid matters more than you’d think, and now I prep my taro pieces the night before so they freeze perfectly.
My partner took one sip and asked if I’d made it at a boba tea shop. That’s when I knew I’d nailed it—the creamy mouthfeel and balanced sweetness hit that cafe-quality mark we all aim for at home.
Since then, I’ve made this smoothie at least twice a week. Friends ask for the recipe constantly, and most are shocked that the velvety texture comes entirely from taro root.
Recipe Overview
- Recipe Name: Taro Smoothie
- Servings: 2
- Prep Time: 5 minutes
- Cook Time: 0 minutes
- Total Time: 5 minutes
- Course: Beverage
- Cuisine: Southeast Asian
- Calories per Serving: 185
Equipment You Will Need
- High-powered blender
- Measuring cups
- Measuring spoons
- Knife and cutting board
- Tall drinking glasses
- Spoon for serving
Ingredients for Taro Smoothie
- Taro root, 1.5 cups (frozen, cubed)
- Almond milk, 1 cup (unsweetened)
- Coconut milk, 1/2 cup (full-fat, canned)
- Banana, 1 medium (frozen, sliced)
- Maple syrup, 1 tablespoon
- Vanilla extract, 1/2 teaspoon
- Ice cubes, 1/2 cup (optional, for extra thickness)
Ingredient Notes and Substitutions
- Taro root brings the signature creamy texture and nutty flavor that defines this smoothie. If you cannot find fresh or frozen taro, canned taro in syrup works but use less sweetener and rinse the pieces first.
- Almond milk is mild and lets taro shine through without competing flavors. Any unsweetened plant-based milk works; oat milk adds creaminess, while coconut milk makes it richer.
- Coconut milk adds richness and complements taro’s earthy notes perfectly. Regular dairy milk or cashew cream are solid swaps, though the flavor will shift slightly.
- Banana provides natural sweetness and additional creaminess while keeping the purple color intact. Frozen mango or pineapple add brightness and work well if you want less sweetness.
- Maple syrup balances taro’s subtle earthiness without overpowering it. Honey, agave, or a splash of condensed milk are easy alternatives.
How to Make Taro Smoothie
Step 1: Prepare Your Taro Root
If using fresh taro, peel it with a vegetable peeler and cut it into 1-inch cubes, then freeze them overnight in a single layer on a baking sheet. Freezing the taro beforehand ensures a thick, creamy texture and cold smoothie without diluting it with extra ice.
Step 2: Gather All Ingredients
Measure out the frozen taro, almond milk, coconut milk, frozen banana slices, maple syrup, and vanilla extract before you start blending. Having everything ready prevents scrambling mid-blend and ensures consistent results every time.
Step 3: Add Liquids to Blender First
Pour the almond milk and coconut milk into your blender pitcher first. Adding liquids before solids helps the blades circulate smoothly and prevents the blender from getting stuck.
Step 4: Layer in the Taro and Banana
Add the frozen taro cubes and banana slices on top of the liquid. Layering frozen ingredients on top of liquid ensures they blend evenly without clumping.
Step 5: Add Sweetener and Flavoring
Drizzle the maple syrup over the mixture and add the vanilla extract. Vanilla brightens the earthy taro and adds depth without making the smoothie taste like vanilla.
Step 6: Add Ice if Desired
If you prefer an extra-thick, slushy smoothie, add the ice cubes now. Skip this step if your taro and banana are already well-frozen and you prefer a thinner consistency.
Step 7: Blend on High Speed
Secure the blender lid and blend on high speed for 60 to 90 seconds until completely smooth with no visible chunks of taro. A high-powered blender (Vitamix, Ninja, or similar) makes a huge difference here; regular blenders may need longer blending time or a splash more liquid.
Step 8: Check Consistency and Adjust
Stop and inspect the smoothie through the blender’s side. If it’s too thick, add a splash of almond milk and blend for another 15 seconds; if too thin, add more frozen taro or banana and blend again.
Step 9: Pour and Serve Immediately
Pour the smoothie into tall glasses right away and serve while frosty cold. Taro smoothies separate slightly if left sitting, so drinking immediately gives the best texture and temperature.
Pro Tip: Freeze your taro at least one full day ahead and keep it in a freezer bag; this prevents ice crystals from forming and delivers that cafe-quality creamy texture every time.
Tips for the Best Taro Smoothie
- Use a high-powered blender if you own one; it handles frozen taro far better than standard blenders and creates a silkier final texture. If you only have a regular blender, thaw the taro slightly at room temperature for 10 minutes before blending.
- Freeze your taro in a single layer on a baking sheet before storing it in bags; this prevents clumping and makes measuring easier. Taro frozen this way lasts up to three months.
- Don’t skip the coconut milk; while almond milk alone works, the full-fat coconut milk is what creates that luxurious, velvety mouthfeel you get at bubble tea shops.
- Taste before serving and adjust sweetness to your preference; some taro is nuttier and less sweet than others, so your maple syrup amount might shift slightly batch to batch.
- Blend just before drinking for the best temperature and texture; blended smoothies break down over time and separate if left in the fridge.
- If your smoothie tastes gritty, your taro wasn’t frozen solid enough or your blender needs more blending time; run it for another 30 seconds on high.
Common Mistakes to Avoid
- Using unfrozen taro results in a warm, thin smoothie with poor texture. Always freeze your taro cubes overnight to achieve the creamy consistency this recipe demands.
- Adding too much liquid from the start makes a thin, watery smoothie that tastes diluted. Add liquid gradually and adjust only after blending; you can always add more but you cannot remove it.
- Skipping the full-fat coconut milk leaves you with a thin, one-note smoothie. That richness is essential to mimicking the cafe quality and taro’s true flavor profile.
- Blending for under 60 seconds leaves chunks of taro that create a grainy, unpleasant mouthfeel. Give your blender a full 90 seconds on high speed to break down the frozen root completely.
- Letting the smoothie sit before drinking causes separation and a loss of creaminess. Taro smoothies are best enjoyed immediately after blending while cold and fully emulsified.
Serving Suggestions
Taro smoothies pair beautifully with breakfast or as an afternoon snack, and they work equally well as a post-workout drink. Serve cold in tall glasses with fun straws for a cafe-style experience at home.
- Pair with almond biscuits or butter cookies for a light breakfast pairing
- Serve after a gym session alongside granola or protein energy bites
- Enjoy as a dessert-like afternoon treat in place of ice cream
- Offer as a crowd-pleasing beverage at brunch gatherings or parties
- Combine with a spinach salad for a balanced lunch that includes greens and fruit
Variations to Try
- Ube Smoothie: Swap taro for ube root for a deeper purple hue and slightly different nutty flavor. The texture and creaminess remain identical, just with a more vibrant color and different taste profile.
- Taro Matcha Blend: Add 1/2 teaspoon matcha powder and 1/4 teaspoon extra vanilla to create an earthy, grounding smoothie with added antioxidants. The matcha plays nicely with taro’s nutty notes without overwhelming them.
- Taro Boba Smoothie: Prepare sweetened boba pearls separately, then spoon a small handful into each glass before pouring the smoothie over top. This mirrors the beloved bubble tea experience and adds a fun chewy texture.
- Chocolate Taro: Add 1 tablespoon unsweetened cocoa powder and increase maple syrup to 1.5 tablespoons for a dessert-like treat. The chocolate deepens the earthiness and pairs surprisingly well with taro’s subtle nuttiness.
- Taro with Honey and Ginger: Replace maple syrup with 1 tablespoon honey and add 1/4 teaspoon fresh ginger juice for warmth and spice. This version feels more grounding and works wonderfully on cooler mornings.
Dietary Adaptations
- Gluten-Free: This recipe is naturally gluten-free as written; just verify that your almond milk and other purchased ingredients carry a gluten-free label if you have severe sensitivity.
- Dairy-Free: Already dairy-free; use plant-based milk and coconut milk as specified. No swaps needed for anyone avoiding all dairy products.
- Vegan: This recipe is fully vegan as is, using only plant-based ingredients. Make certain your maple syrup is certified vegan if that matters to you.
- Low-Carb/Keto: Taro is too high in carbs for strict keto, but you could substitute cauliflower rice cooked and frozen, though the flavor and texture will differ significantly. This adaptation sacrifices the smoothie’s signature taste for carb reduction.
- Paleo: Taro is a starch and not typically paleo-approved, but if following a flexible interpretation, this recipe works as written using maple syrup and plant-based milk.
Storage and Reheating
Refrigerator
Store leftover taro smoothie in an airtight glass container for up to 24 hours, though separation occurs quickly. For best quality, blend fresh each time rather than storing pre-made smoothies.
- Pour into glass containers with airtight lids
- Keep toward the back of the fridge where it stays coldest
- Shake or restir vigorously before drinking, as the mixture separates over time
Freezer
Freeze prepared taro smoothie in ice cube trays or popsicle molds for smoothie bowls or frozen treats later. This works better than storing liquid smoothies, as the frozen form prevents separation.
- Pour into silicone ice cube trays or popsicle molds
- Freeze for at least 4 hours until solid
- Transfer frozen cubes to freezer bags and use within two months
Reheating
Taro smoothies are meant to be served cold and do not reheat well; thawing frozen cubes at room temperature for a few minutes and re-blending is your best option. Never microwave a prepared smoothie, as it breaks down the texture and separates the ingredients.
- Remove frozen cubes and thaw at room temperature for 5 to 10 minutes
- Blend again briefly with a splash of fresh almond milk to restore creaminess
- Serve cold; do not heat
Nutrition Information
| Nutrient | Amount |
|---|---|
| Calories | 185 |
| Total Fat | 8g |
| Saturated Fat | 6g |
| Carbohydrates | 28g |
| Fiber | 4g |
| Sugar | 12g |
| Protein | 2g |
| Sodium | 95mg |
| Cholesterol | 0mg |
Nutrition values are approximate and based on standard ingredient sizes and brands. Exact totals vary depending on your specific products and portion sizes.
Frequently Asked Questions
Can I use canned taro instead of fresh or frozen?
Yes, canned taro in syrup works but rinse it well and reduce the maple syrup to 1/2 tablespoon to avoid excess sweetness. The texture won’t be quite as creamy as fresh frozen taro, but it’s a convenient shortcut when taro root isn’t available.
Where do I buy taro root?
Most Asian grocery stores carry fresh taro root year-round in the produce section, usually priced affordably. Whole Foods and other mainstream grocers increasingly stock it too, often in the specialty produce area or frozen section.
How far ahead can I prep frozen taro?
Frozen taro cubes keep for up to three months in an airtight freezer bag. Prepare a batch on a Sunday and you’ll have smoothie-ready taro all week long.
Why does my smoothie taste gritty or grainy?
A gritty texture usually means your blender didn’t process the frozen taro long enough or your taro wasn’t fully frozen when blending. Run the blender for a full 90 seconds on high speed and ensure your taro freezes solid overnight before use.
Can I make this smoothie without a high-powered blender?
Standard blenders can work, but they may struggle with frozen taro. Thaw your taro at room temperature for 10 minutes before blending and blend for a longer time, around two to three minutes on high, then check the consistency.
Is taro smoothie high in sugar?
This recipe contains about 12 grams of sugar per serving, mostly from the banana and maple syrup. If you want less sugar, reduce the maple syrup to 1/2 tablespoon or swap it for stevia, though the smoothie will taste less sweet overall.
Does this smoothie contain any common allergens?
This recipe is naturally free from tree nuts, peanuts, soy, and gluten as written. Verify ingredient labels if you have severe allergies, as cross contamination can occur during manufacturing of store-bought milk alternatives.
Final Thoughts
Taro smoothies have a way of making you feel like you’re sipping something special, even though they’re incredibly simple to make at home. Once you nail the ratio and freeze your taro properly, you’ll find yourself blending these regularly.
Try this recipe this week and taste the difference quality ingredients and proper technique make. You’ll understand immediately why taro smoothies have become such a beloved menu staple.
Explore More Smoothie and Beverage Recipes
If you loved this taro smoothie recipe, you’ll want to explore more unique smoothie and beverage ideas for different occasions and tastes. Check out these related recipes to expand your smoothie skills and discover new flavor combinations.
Try making a taro boba recipe for a fun variation that adds chewy texture to your favorite flavors.
For a health-focused option, explore a beet smoothie recipe for high blood pressure that combines nutrition with delicious taste.
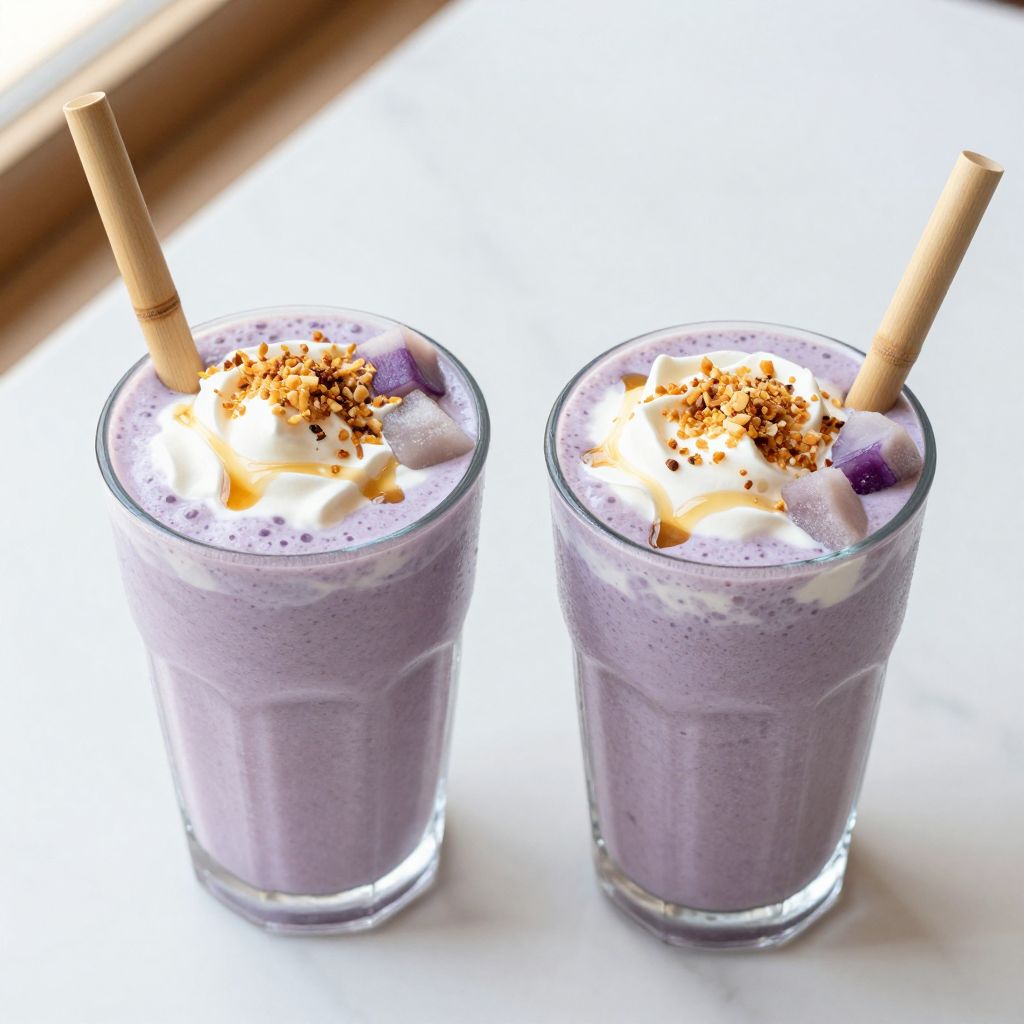
Taro Smoothie
Ingredients
Equipment
Method
- Peel fresh taro root and cut into 1-inch cubes, then freeze overnight in a single layer.
- Measure out frozen taro cubes, almond milk, coconut milk, frozen banana slices, maple syrup, and vanilla extract.
- Pour almond milk and coconut milk into the blender first.
- Add frozen taro cubes and banana slices on top of the liquid.
- Drizzle in maple syrup and add vanilla extract.
- Add ice cubes if you want extra thickness.
- Secure the blender lid and blend on high speed for 60 to 90 seconds until completely smooth.
- Check the consistency; if too thick add a splash of almond milk and blend for another 15 seconds or if too thin add more frozen taro or banana and blend again.
- Pour the smoothie into tall glasses and serve immediately while cold.