There’s something magical about the smell of apples simmering with spices and spirits that fills your kitchen with warmth on a crisp autumn day. Applejack is a potent, smooth apple brandy that you can actually make at home, and it tastes like you’ve bottled up the essence of fall itself.
This isn’t your grandmother’s canning project, but it’s equally rewarding and far more fun at dinner parties. The process is simple enough for beginners yet produces results that rival store-bought versions at a fraction of the cost.
Why You’ll Love This Recipe
Homemade applejack delivers smooth, concentrated apple flavor with a warming alcohol content that makes it perfect for sipping or mixing. You control the sweetness, spice level, and potency, which means you get exactly the drink you want.
- Makes an impressive homemade gift that costs pennies compared to craft spirits
- Requires minimal active work time, mostly just patience and waiting
- Versatile enough for sipping neat, mixing into cocktails, or using in cooking
- Natural preservation means your batch stays fresh for years
- Teaches you a real skill that feels like genuine alchemy
My Experience Making This Recipe
The first time I made applejack, I was skeptical that freezing apple cider could actually concentrate it into something special. After three weeks of patient straining and tasting, I poured my first shot and understood why this stuff has been made for centuries.
My friends have since requested bottles as gifts, and I’ve made five batches in the past year alone. The flavor is richer and more complex than commercial versions, with a smoothness that comes from time rather than additives.
The best part? Watching people’s faces when you tell them you made it yourself. There’s genuine amazement that follows, and deservedly so.
Recipe Overview
- Recipe Name: Homemade Applejack
- Servings: Makes approximately 750 milliliters
- Prep Time: 20 minutes
- Freeze Time: 3 to 4 weeks
- Total Time: 3 to 4 weeks plus 20 minutes active time
- Course: Beverage
- Cuisine: American
- Alcohol Content Per Serving: Approximately 15% to 20% ABV depending on method
Equipment You Will Need
- Large freezer-safe container or glass jar with tight-fitting lid
- Cheesecloth or coffee filters
- Fine mesh strainer
- Funnel
- Glass bottles with cork or sealed lids for storage
- Thermometer that reads below 32 degrees Fahrenheit
- Measuring cups and spoons
- Large bowl for straining
- Kitchen towels
Ingredients for Applejack
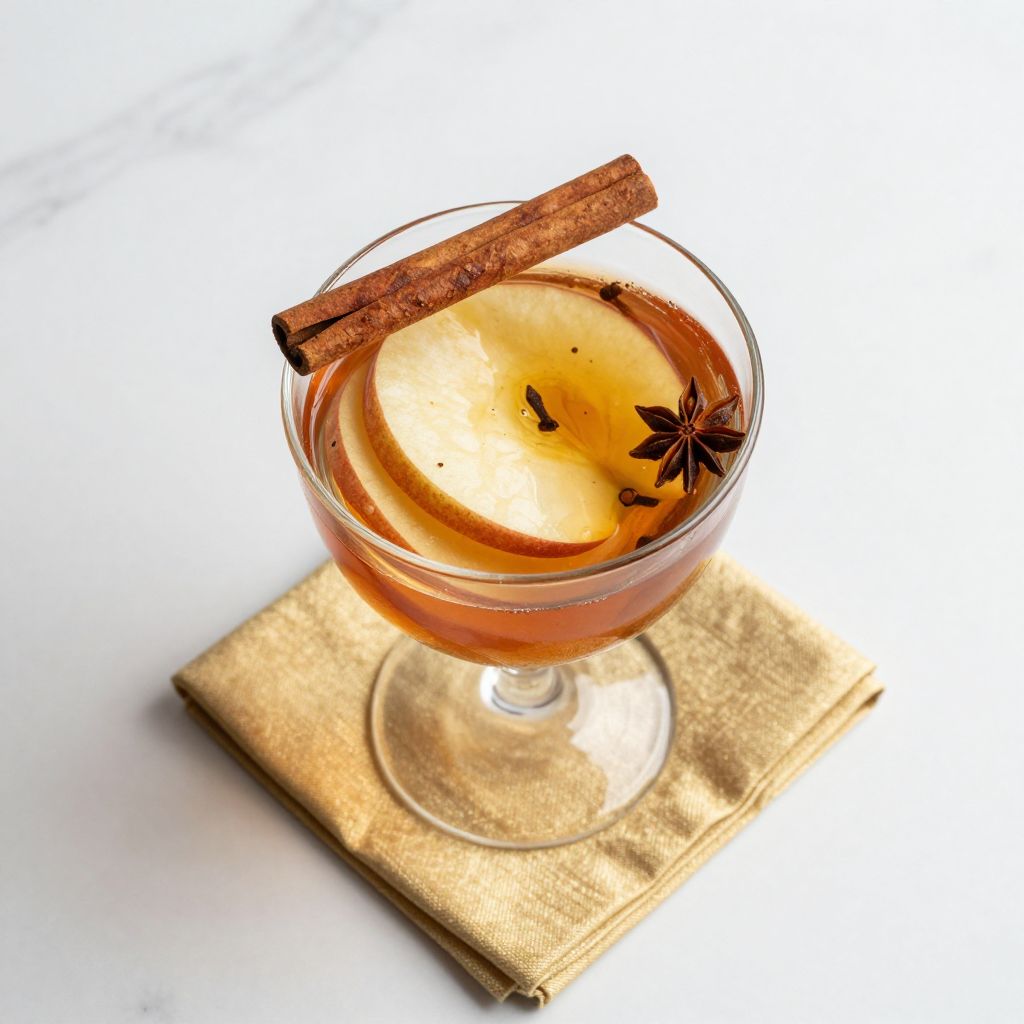
- 1 gallon of apple cider (fresh, unpasteurized if possible, or use pasteurized as backup)
- 1 whole cinnamon stick (optional, but recommended)
- 2 to 3 whole cloves (optional)
- 1 star anise (optional, adds subtle licorice note)
- 1 thin slice of fresh ginger (optional)
- Pinch of nutmeg (optional)
Ingredient Notes and Substitutions
- Apple Cider: Fresh, unpasteurized cider has living cultures that enhance fermentation and complexity. If unavailable, pasteurized cider works fine, though the final flavor may be slightly less nuanced.
- Cinnamon Stick: Provides warm spice and pairs naturally with apple. If you dislike cinnamon, omit it entirely and add an extra clove instead for depth.
- Cloves: Add peppery warmth without overpowering. Allspice berries offer a similar profile but taste slightly different and more rounded.
- Star Anise: Contributes subtle sweetness and complexity. Skip it if you dislike licorice flavors, or substitute with a small piece of fennel seed.
- Fresh Ginger: Adds gentle spice and aids digestion. Replace with a pinch of ground ginger if fresh isn’t available, though use half the amount.
How to Make Applejack
Step 1: Choose Your Freezing Method
You have two paths here: the freeze-concentration method (easier, slower) or the quick-freeze method (faster, requires more attention). The freeze-concentration method works by repeatedly freezing and thawing your cider to separate water from the concentrated liquid, leaving behind pure apple essence.
Choose freeze-concentration if you have time and patience, as this yields smoother results with better flavor integration over several weeks. Pick the quick-freeze method only if you need results in days rather than weeks.
Step 2: Pour and Prep Your Cider
Pour your gallon of apple cider into a large freezer-safe container, leaving about 2 inches of headspace at the top since liquid expands when frozen. Add your cinnamon stick, cloves, star anise, ginger slice, and nutmeg directly into the liquid, as these will infuse throughout the freezing process.
The spices need this time to release their oils and marry with the apples. Don’t skip this step or your final applejack will taste flat and one-dimensional.
Step 3: First Freeze
Secure the lid tightly and place the container in your coldest freezer space, ideally where the temperature stays at 0 degrees Fahrenheit or below. Set a phone reminder for 24 hours so you don’t forget about it and end up with solid ice that won’t cooperate.
The cider will take roughly 18 to 24 hours to freeze solid depending on your freezer’s temperature. Patience here pays off in better results.
Step 4: First Thaw and Strain
Remove the container from the freezer and let it sit at room temperature for 4 to 6 hours until it reaches a partially thawed state where you have liquid and ice mixed together. Line your fine mesh strainer with cheesecloth and position it over a large bowl.
Pour the partially thawed mixture through the cheesecloth slowly, allowing gravity to separate the concentrated liquid from the ice crystals. The liquid that drips through is your concentrated juice; the ice that remains is mostly water and gets discarded.
Step 5: Second Freeze
Pour your collected liquid back into the clean freezer container, cover it tightly, and return it to the freezer for another 24 hours. Repeat this freeze-and-thaw cycle a minimum of 3 times for proper concentration, though 4 to 5 cycles yield even richer results.
Each cycle concentrates the flavor and increases the alcohol content naturally as water content decreases. Think of it as apple essence becoming more and more potent with each repetition.
Step 6: Final Collection and Filtering
After your final thaw, strain through cheesecloth one last time and collect your concentrated liquid in a clean glass bowl. Let this liquid settle for a few hours so any sediment sinks to the bottom, then carefully pour off the clear liquid into your storage bottles, leaving the sediment behind.
The clarity of your final product matters for appearance and smoothness on the palate. Don’t rush this step by forcing cloudy liquid through.
Step 7: Taste and Adjust Sweetness
Take a small sip of your concentrated applejack to evaluate the flavor profile and sweetness level. Most batches need no adjustment, but if yours tastes too tart, add a tablespoon of honey or organic cane sugar dissolved in a tablespoon of warm water, then stir gently.
If it tastes too sweet, you can’t really fix that without diluting it, so keep this in mind for your next batch. Start conservative with sweetness and add more later if needed.
Step 8: Bottle and Age
Pour your finished applejack into clean glass bottles with airtight seals or cork tops. Label each bottle with the date and contents so you remember when you made it and what’s inside.
Store in a cool, dark place like a pantry or cellar rather than a bright kitchen cabinet. Your applejack can age for years without spoiling, though most people find it reaches peak smoothness after 2 to 3 months of additional bottle aging.
Pro Tip: The key to exceptional applejack is patience during the freeze-thaw cycles; rushing through fewer cycles leaves you with overly sweet, less concentrated results that taste more like regular cider than true applejack.
Tips for the Best Applejack
- Use the coldest part of your freezer where temperature holds steady at 0 degrees Fahrenheit or below. Fluctuating temperatures compromise the concentration process and can introduce unwanted fermentation.
- Don’t squeeze or press the cheesecloth during straining because forcing liquid through introduces cloudiness and off-flavors. Patience during draining makes a smoother final product.
- Keep your containers and bottles impeccably clean before use to prevent contamination. A quick rinse with boiling water followed by air drying works perfectly.
- Track your cycles by labeling the container with a marker so you don’t lose count halfway through. Doing 3 cycles minimum ensures proper concentration, but 5 cycles makes something truly special.
- Taste your applejack every few weeks after bottling to monitor how it smooths out and develops complexity. You’ll notice real improvement around the 6 to 8 week mark.
- Keep one bottle sealed and unopened so you can compare it to newly made batches down the road. It’s fun to see how your technique improves over time.
Common Mistakes to Avoid
- Using pasteurized cider exclusively: While it works, unpasteurized cider produces more complex, rounded flavors. Mix the two types if that’s all you can find.
- Opening the freezer repeatedly during freezing: Each time you crack the door, temperature fluctuates and your ice melts unevenly. Commit to 24-hour intervals and resist peeking.
- Stopping after just one freeze-thaw cycle: You’ll get something that tastes like spiced cider, not applejack. The minimum is 3 cycles, and 4 to 5 truly shines.
- Adding too many spices: A little goes a long way when concentrating. Your applejack should taste like apple first, with spices playing a supporting role, not the lead.
- Storing bottles in bright light: Sunlight degrades color and flavor over time. Keep your applejack in a dark cupboard or pantry away from windows and overhead lights.
Serving Suggestions
Serve your applejack neat in a small glass at room temperature to really appreciate the concentrated apple flavor and warming alcohol burn. It also works wonderfully as a base for fall cocktails or drizzled over vanilla ice cream.
- Sipped neat or over a single ice cube as an after-dinner digestif
- Mixed into cocktails with bourbon, ginger beer, and fresh lemon juice
- Stirred into hot apple cider or coffee on cold mornings for extra warmth
- Drizzled over roasted pork or duck as a finishing glaze
- Combined with champagne for a festive fall sparkler
Variations to Try
- Spiced Applejack: Add 3 to 4 whole allspice berries and a small piece of star anise to your cider before freezing for deeper, more complex spice notes that shine in cocktails.
- Vanilla Applejack: Split a vanilla bean lengthwise and add it to your cider during the freeze cycles for subtle sweetness and silky mouthfeel that elevates sipping experience.
- Smoked Applejack: Add a tiny pinch of smoked paprika or a single drop of liquid smoke in your final adjustment step for a sophisticated, subtle smokiness that pairs well with bourbon cocktails.
- Pear-Apple Jack: Replace half the apple cider with pear cider for a lighter, slightly more delicate flavor that still concentrates beautifully and appeals to those who prefer pear over apple.
- Cranberry Applejack: Add one cup of fresh or frozen cranberries to your cider before the first freeze for tart complexity and a beautiful pink hue that makes it special at holiday gatherings.
Dietary Adaptations
- Vegan and Vegetarian: This recipe is naturally vegan since it contains only apples, spices, and water. No animal products are involved anywhere in the process.
- Gluten-Free: Applejack is gluten-free by nature since it’s just concentrated apple juice. Verify that any cider you purchase hasn’t been cross-contaminated during processing if you have severe sensitivity.
- Lower Sugar: The freeze-concentration process naturally concentrates sugars, so applejack is higher in sugar than regular cider. You can’t reduce sugar without compromising the whole concept of the recipe.
- Low Sodium: Applejack contains virtually no sodium, making it suitable for anyone monitoring salt intake. Cider naturally has minimal sodium content.
Storage and Reheating
Refrigerator
Store your finished applejack in sealed glass bottles on a pantry shelf or in a cool cupboard rather than taking up precious refrigerator space. Applejack doesn’t require refrigeration since the alcohol content acts as a natural preservative.
- Keeps for 3 to 5 years in a cool, dark pantry
- No refrigeration needed
- Improved flavor after 2 to 3 months of bottle aging
Freezer
You can freeze applejack if you want, though it’s not necessary and takes up valuable freezer space. The alcohol content prevents it from freezing solid at typical home freezer temperatures anyway.
- Stays fresh indefinitely if frozen, though aging stops
- Thaw at room temperature before opening
- Not recommended since aging benefits are suspended
Reheating
Applejack doesn’t need reheating since you serve it at room temperature or chilled. If using it in hot cocktails or cooked dishes, simply pour it directly into the hot liquid where it warms instantly.
- For hot drinks, add just before serving to preserve delicate flavors
- In cooked dishes, add early so alcohol cooks off but flavor remains
- Never boil applejack as high heat destroys its complexity
Nutrition Information
| Nutrient | Amount |
|---|---|
| Calories | 65 per 1.5-ounce serving |
| Total Fat | 0 grams |
| Saturated Fat | 0 grams |
| Carbohydrates | 8 grams |
| Fiber | 0 grams |
| Sugar | 7 grams |
| Protein | 0 grams |
| Sodium | 5 milligrams |
| Cholesterol | 0 milligrams |
These values are approximate and based on standard apple cider nutritional content concentrated through freezing. Actual nutrition varies based on the specific cider brand and your exact freezing cycles.
Frequently Asked Questions
Can I use bottled apple juice instead of cider?
You can, but cider tastes better since it has more body and complexity. Juice concentrates mostly into sweetness without the depth that fresh cider provides.
What if my applejack tastes too harsh or hot?
This usually means you stopped freezing too early or your cider was too high in alcohol to begin with. Let it age for 3 to 4 months in the bottle and the flavors will mellow and integrate beautifully.
Can I make this without freezing cycles?
Not really, since the freeze-concentration is what makes applejack special and different from regular cider. You could simmer cider on the stovetop to reduce it, but you’d lose delicate flavors that freezing preserves.
How do I know when my cider is fully frozen?
Insert a long knife or thin thermometer probe into the center; if it meets solid resistance, you’re frozen solid. Don’t rely on the surface appearance since the edges freeze first and the center stays liquid longer.
Is homemade applejack legal to make?
Yes, making applejack through freeze-concentration is legal in most countries since it doesn’t involve fermentation or distillation. Check local laws in your area to be completely sure, but home freezing is generally permitted.
Can I add alcohol to my cider to boost the applejack?
You can add vodka or high-proof spirits, but this isn’t true applejack and misses the whole point of this recipe. The magic comes from natural concentration through repeated freezing, not from adding extra alcohol.
What’s the difference between applejack and apple brandy?
Applejack is traditionally made through freezing, while apple brandy is distilled. Your homemade version is technically applejack, though many people use the terms interchangeably now.
Final Thoughts
Making applejack at home feels like you’re learning a frontier skill, and honestly, you kind of are
Homemade Applejack
Ingredients
Equipment
Method
- Pour 1 gallon of apple cider into a large freezer-safe container, leaving about 2 inches of headspace at the top. Add cinnamon stick, cloves, star anise, ginger slice, and nutmeg directly into the liquid.
- Secure the lid tightly and place the container in your coldest freezer space at 0 degrees Fahrenheit or below. Freeze for 24 hours until solid.
- Remove the container from the freezer and let it sit at room temperature for 4 to 6 hours until partially thawed with liquid and ice mixed together.
- Line a fine mesh strainer with cheesecloth and position it over a large bowl. Pour the partially thawed mixture through the cheesecloth slowly, allowing the concentrated liquid to separate from the ice crystals. Discard the ice.
- Pour the collected liquid back into the clean freezer container, cover tightly, and return to the freezer for another 24 hours.
- Repeat the freeze-and-thaw cycle a minimum of 3 times total, or 4 to 5 cycles for richer results.
- After the final thaw, strain through cheesecloth one last time and collect the concentrated liquid in a clean glass bowl. Let settle for a few hours so sediment sinks to the bottom.
- Carefully pour off the clear liquid into storage bottles, leaving the sediment behind. Taste and adjust sweetness if needed by adding a tablespoon of honey dissolved in warm water.
- Pour finished applejack into clean glass bottles with airtight seals or cork tops. Label with date and contents. Store in a cool, dark place like a pantry or cellar.
- Age for 2 to 3 months for peak smoothness before serving at room temperature or chilled.